Facilities Integration in Mewayz (Formerly Seemless)
The Facilities Add-On is designed to streamline the management of physical and digital resources within an organization.
Introduction
The Facilities Add-On is a comprehensive platform designed to streamline facility booking and management. It offers a user-friendly dashboard that provides an overview of key metrics such as total spaces, active services, bookings, and revenue. The system allows easy creation and management of facility bookings, services, and spaces, with flexible options for configuring working hours, payment methods, and customer inquiries. Users can customize branding, banners, and page titles, along with managing FAQs and custom pages for a tailored experience. Through intuitive tools, both admins and visitors can efficiently navigate through booking, payment, and service management, ensuring seamless operations for facility owners and a smooth booking experience for customers.
How to Install the Add-On?
To install the add-on you can follow this link: Setup Add-On.
How to Use the Facilities Add-On?
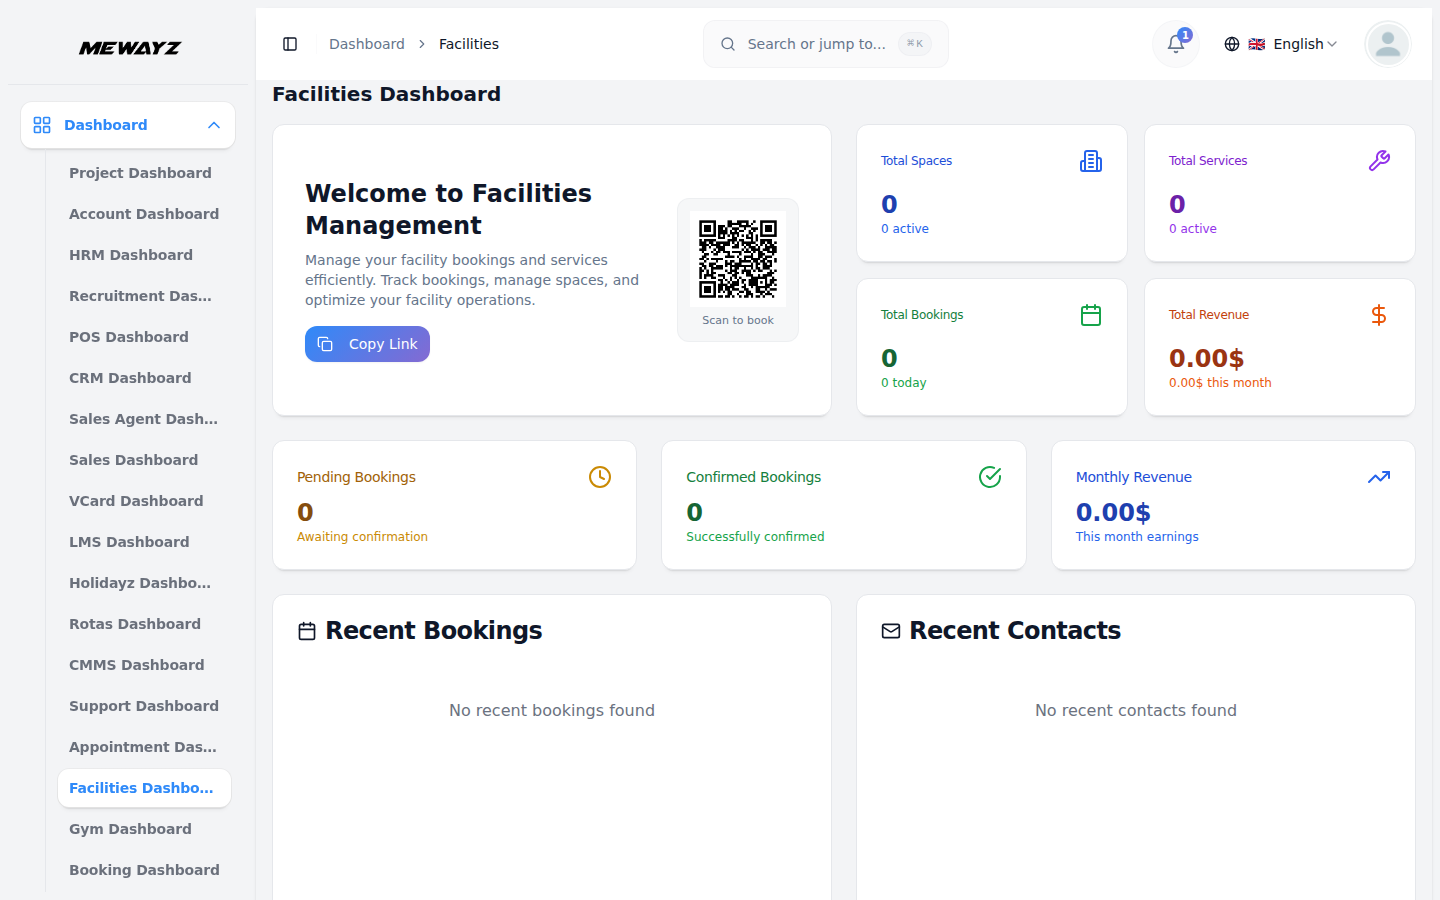
Facilities Dashboard
- After logging into the system, access the Facilities Dashboard to get a complete
- The Facilities Dashboard displays a welcome card with a QR code that users can
- The dashboard displays key metrics through summary cards. The Total Spaces card
- The Total Bookings card shows the total number of bookings made and indicates
- The Pending Bookings card shows the number of bookings awaiting confirmation.
- At the bottom left, the Recent Bookings section displays your latest facility
- On the bottom right, the Recent Contacts section shows the latest contact
overview of your facility booking operations.
scan to access the booking system. Click the “Copy Link” button to share your facility booking platform.
shows the total number of facility spaces in your system, along with how many are currently active. The Total Services card displays the total number of facility services available and how many are active.
how many bookings were made today. The Total Revenue card displays your total revenue generated and shows the revenue earned this month.
The Confirmed Bookings card displays the number of bookings that have been successfully confirmed. The Monthly Revenue card shows the earnings for the current month.
bookings with the booking number, status badge, customer name, booked facilities or services, booking date, and total amount.
inquiries submitted through your platform, displaying the contact name, email address, subject of the inquiry, and timestamp.
Facility Bookings
- To create a new facility booking, click the “Create” button at the top right of
- Select the Service from the dropdown menu(which comes from the facility service
- You can select multiple time slots for flexible booking. After selecting your
- The calculation shows the total hours multiplied by the hourly rate, displaying
- The list page displays all facility bookings in a table with columns for Booking
- Click the Filters button to access filtering options. Select the Booking Date
- In the actions column, you can use options that include View (clicking on this
the Manage Facility Bookings page. Enter the Customer Name, Customer Email, and Customer Mobile.
section). Choose the Booking Date. Select your preferred time slot from the available Slots (note: you must select service and date first before slots become available).
slot, the Booking Summary section will automatically display the selected service, date, and calculation details.
the Total Amount for the booking. The Selected Time will also be shown to confirm your chosen slot. Enter the number of Participants. Add any additional information in the Notes.
Number, Name, Email, Mobile, Service Name, Booking Date, Time Slots, Participants, Total Amount, Payment Status, and Actions. Use the search bar at the top to find specific booking data.
using the date picker or choose a Service from the Filter by Service dropdown (comes from the facility service section). Click the Apply button to filter the data or the Clear button to reset the filters.
will display the complete booking details), Edit (clicking on this allows you to modify the booking information), and Delete (clicking on this will remove the booking from the system).
Facility Booking Order
- The Facility Booking Order page displays all bookings organized in a kanban
- Each booking card displays the customer name, booking number, booking date,
- To change a booking’s status, click and drag the booking card from one column to
- The columns indicate the booking lifecycle: Pending (newly created bookings
- Click the three-dot menu icon on any booking card to access additional options
- The menu includes View (clicking on this will display the complete booking
- On the website’s booking page, visitors can make reservations through the
- In the Reservation Information section, visitors need to select a Service from
- In the Personal Information section, visitors fill in their Full Name, Mobile
- After completing all fields, visitors click “Complete Booking” to submit their
- Note frontend in all booking facilities are automatically shown booking order
board with four status columns: Pending, Confirmed, Completed, and Cancelled. The number next to each status shows the total count of bookings in that column.
number of participants, service/facility name, time slot, and total amount.
another. For example, drag a card from the Pending column to the Confirmed column to confirm the booking. Drop the card in the desired column to update its status.
awaiting confirmation), Confirmed (bookings that have been approved and confirmed), Completed (bookings that have been successfully finished), and Cancelled (bookings that were cancelled).
for managing that specific booking.
details), Edit (clicking on this allows you to modify the booking information), and Delete (clicking on this will remove the booking from the system).
booking form. The header displays “Book Your Ideal Space” with the description “Complete the smart booking form to reserve your perfect workspace instantly.”
the dropdown(comes from the service section in backed), choose a Date, and enter the Number of People. After selecting service and date, available time slots will appear.
Number, and Email Address. In the Payment Information section, visitors select their preferred Payment Option (Credit/Debit Card via Stripe or PayPal) and can add any Additional Notes.
reservation. All booking submissions from the website automatically appear in the backend Manage Facility Bookings page for easy management.
under the confirmed status & payment receipt are auto generated. when the facility bookings page in create booking status is pending and that payment receipts are not generated. payment receipt generated for need to update status to confirm.
Facility Payments
- The Payment Transactions page displays all payment records in a table with
- Click the Filters button to access filtering options. Select the Payment Method
- In the actions column, you can use the download pdf (clicking on this will
- Each transaction record shows the payment method used (Stripe, Cash, or PayPal),
columns for Booking Number, Payment Method, Transaction ID, Amount, Payment Date, Customer Name, Customer Email, and Actions. Use the search bar at the top to find specific transactions by entering the booking number.
from the dropdown menu (options include Stripe, Cash, or PayPal). Click the Apply button to filter the data or the Clear button to reset the filters.
download the payment receipt or transaction details pdf) and the view (clicking on this will display the complete payment transaction details).
the unique Transaction ID for reference, the amount paid with currency, and the exact payment date and time, along with customer information.
Facility service
- To create a new facility service, click the “Create” button at the top right of
- In the Details tab, enter the Name of the facility service. Enter the SKU (Stock
- In the Pricing tab, enter the Sale Price. Enter the Purchase Price. Click Next
- In the Media tab, click the Browse button under Main Image to upload a primary
- In the Facility Config tab, select the Facility Space from the dropdown menu
- After filling in all the required details across all tabs, click the Create
- The list page displays all facility services in a table with columns for Name,
- Click the Filters button to access filtering options. Select the Status from the
- In the actions column, you can use options that include View (clicking on this
the Manage Facility Services page. The creation process is organised into four tabs: Details, Pricing, Media, and Facility Config.
Keeping Unit) or click the Generate button to automatically create one. Select applicable Taxes from the dropdown menu. Enter a Short Description for the service. Click Next to proceed to the Pricing tab.
to proceed to the Media tab or Previous to go back.
image for the service. Click the Browse button under Gallery Images to upload multiple additional images. Click Next to proceed to the Facility Config tab or Previous to go back.
(which comes from the facility space section). Enter the Duration (Hours) for the service. Enter the Max People. Check the Allow Flexible Duration checkbox if you want to permit variable booking lengths for this service. Select the Status from the dropdown (Active or Inactive).
button to submit the facility service. Click Cancel at any time to discard the changes. Use Previous to navigate back through the tabs if you need to modify earlier information.
Sale Price, Duration, Max People, Status, and Actions. Use the search bar at the top to find specific facility services. Toggle between list view and grid view using the view buttons.
Filter by Status dropdown (Active or Inactive). Click the Apply button to filter the data or the Clear button to reset the filters.
will display the complete service details), Edit (clicking on this allows you to modify the service information), and Delete (clicking on this will remove the service from the system).
Facility Spaces
- To create a new facility space, click the “Create” button at the top right of
- Enter the Location (building and floor details). Enter the Capacity. Add
- Click the ” Add Specification” button to include additional specifications for
- The list page displays all facility spaces in a table with columns for Name,
- Click the Filters button to access filtering options. Select the Status from the
- Each facility space entry shows the amenities as tags or labels, making it easy
- The available action options include View (clicking on this will display the
the Manage Facility Spaces page. Enter the Name of the facility space. Select an Icon from the dropdown menu (optional).
Amenities by typing them in the Amenities (such as Computers, Internet, Study Tables, etc.).
the facility space (optional). Select the Status from the dropdown menu (Active or Inactive).
Location, Capacity, Amenities, Status, and Actions. Use the search bar at the top to find specific facility space record.
Filter by Status dropdown (Active or Inactive). Click the Apply button to filter the data or the Clear button to reset the filters.
to quickly identify available features. The Status is displayed with color coding (green for Active, red for Inactive).
complete facility space details), Edit (clicking on this allows you to modify the space information), and Delete (clicking on this will remove the facility space from the system).
Facility Working Hours
- To create working hours for a facility, click the “Create” button at the top
- In the Weekly Schedule section, toggle the switch for each day you want the
- After configuring all working days and hours, click the Create button to save
- The list page displays all facility working hours in a card-based layout. Each
- Each day displays its status as either Open with the time range (e.g., 09:00 AM
- Use the search bar at the top to find specific facility working hours by
- Each facility card includes action at the top right: the copy (clicking on this
right of the Manage Facility Working Hours page. Select the facility Space from the dropdown menu(comes from the facility space section).
facility to be open. Days left toggled off will remain as “Day Off” (closed). For each day you enable, set the opening and closing times.
the weekly working hours schedule. Click Cancel to discard the changes.
card shows the facility name with a location icon, along with the complete weekly schedule listing all seven days.
– 06:00 PM), or Closed for days when the facility is not available.
entering the facility name or keyword.
duplicates the working hours to apply to another facility), the edit (clicking on this allows you to modify the working hours), and the delete (clicking on this removes the working hours configuration).
Manage Contacts
- The Manage Contacts page displays all contact inquiries in a table with columns
- Each contact entry shows the person’s name, email address, phone number, and the
- In the actions column, you can use the view (clicking on this will display the
- On the website’s Contact page, visitors can submit inquiries through the “Get
- The right side shows contact information including Phone, Email, and Address.
for Name, Email, Phone, Subject, and Actions. Use the search bar at the top to find specific contacts by entering a name, email, phone number, or subject keyword.
subject of their inquiry or request.
complete contact details and message) and the delete (clicking on this will remove the contact from the system).
Expert Assistance” form. They need to fill in a Full Name, Email Address, Phone Number, Subject, and Message, then click “Send Message” to submit.
All contact submissions from the website automatically appear in the backend Manage Contacts page for easy management.
System Setup
- The System Setup section allows you to configure and customize various aspects
of your facility booking platform. Access different settings through the left sidebar menu.
Brand Settings
- In the Brand Settings section, click the Browse button next to Logo to upload
- Enter the Site Title in the provided field. Enter the Footer Copyright Text.
- In the Mewayz (Formerly Seemless)board Welcome Card Settings section, enter the Card Title. Write the
- Once saved, the Logo and Favicon will appear across your facility booking
your main logo image. Click the Browse button next to Footer Logo to upload a logo that will display in the footer section. Click the Browse button next to Favicon to upload the small icon that appears in browser tabs.
Write the Footer Description in the text area.
Card Description. Enter the Button Text. Select the Button Icon. Click Save Changes to update.
website, while the Footer Logo, Site Title, Footer Copyright Text, and Footer Description will display in the footer section on the frontend. The Dashboard Welcome Card will appear on the main dashboard for users.
Banner Settings
- In the Banner Settings section, click the Browse button next to Banner
- Enter the Banner Badge Text. Enter the Banner Title. Write the Banner
- Once saved, the Banner Background Image, Banner Badge Text, Banner Title, and
Background Image to upload the background image.
Description in the text area. Click Save Changes to update.
Banner Description will automatically appear in the banner area of your website’s homepage.
Page Titles
- In the Page Titles section under Title Section, configure the Home page
- Under Page Headers, configure the Facilities Page by entering the Header Title
- Configure the Contact Page by entering the Header Title and writing the Header
- Under Form Sections, configure the Booking Form by entering the Section Title
- Under Contact page Sections, configure Contact Information by entering the
- Once saved, these titles and descriptions will display as section headings
Sections. In the Statistics Section, enter the Title and write the Description. In the Facility Types section, enter the Title and write the Description. In the Features Section, enter the Title and write the Description.
and writing the Header Description. Configure the Booking Page by entering the Header Title and writing the Header Description.
Description. Configure the FAQ Page by entering the Header Title and writing the Header Description.
and writing the Section Description. Configure the Contact Form by entering the Section Title and writing the Section Description.
Section Title and writing the Section Description. Click Save Changes to update.
across different pages of your frontend website.
Features & CTA Settings
- In the Features Section, each feature item includes Feature Title, Feature Icon,
- Click the delete icon at the top right of any feature item to remove it. Click
- In the CTA Section, enter the CTA Title. Write the CTA Description in the text
- Once saved, the Features Section will display on your homepage showcasing your
and Feature Description fields. Enter the Feature Title. Select the Feature Icon. Write the Feature Description in the text area.
the ” Add Feature” button to add additional feature items.
area. Click Save Changes to update.
platform’s key capabilities, and the CTA Section will appear encouraging visitors to take action.
Footer Settings
- In the Footer Settings section under Phone Number, enter your Phone Number in
- Under Address, enter your full Address in the provided field. Select the Address
- Once saved, the Phone Number, Email Address, and Address will display in the
the provided field. Select the Phone Icon. Under Email Address, enter your Email Address in the provided field. Select the Email Icon.
Icon. Click Save Changes to update.
footer section of your frontend website with their corresponding icons.
FAQ Management
- In the FAQ section under Questions & Answers, each FAQ item includes Question
- Click the delete icon at the top right of any FAQ item to remove it. Click the
- Once saved, the FAQ section will display on the frontend website with questions
and Answer fields. Enter the Question in the text field. Write the Answer in the text area.
“Add FAQ” button at the bottom to add more frequently asked questions. Click Save Changes to update.
and expandable answers.
Custom Pages
- The Custom Pages section displays all created custom pages in a table with
- To create a new custom page, click the “Create” button at the top right. Enter
- Toggle the Enable Page Footer switch to include this page link in the website
- Available actions include the link icon (clicking on this opens the page in a
- Once created, the custom page will be accessible on the frontend website through
columns for Title, Slug, Footer, and Action. The Slug column shows the URL path for each page. The Footer column indicates whether the page is Enabled or Disabled in the footer menu.
the Title in the provided field. Write the Description in the text area. Use the Content rich text editor to create your page content. Use the formatting toolbar to apply bold, italic, underline, strikethrough, alignment, lists, quotes, links, and other text formatting.
footer menu. Click Cancel to discard the changes or click Create to save the custom page.
new tab), Edit (clicking on this allows you to modify the custom page content), and Delete (clicking on this will remove the custom page from the system).
its generated URL slug, and if the footer is enabled, it will appear in the footer navigation menu.
Homepage
- The homepage banner displays “Intelligent Facility Booking” with the description
- The statistics section shows “Leading Organizations Choose Us” with three cards
- The facilities section shows “Complete Workspace Solutions” with a carousel
- The features section displays “Advanced Platform Features” with three cards:
- The CTA section shows “Transform Your Workspace Today” with two buttons: “Start
- The footer displays the logo, Quick Links (Our Facilities, Privacy Policy, Terms
and a “Start Booking” button.
displaying Total Spaces, Active Bookings, and Total Services.
displaying facility cards including Cafeteria, Library, Laboratory A, and Reception Hall with their locations.
Real-Time Availability, Predictive Analytics, and Enterprise Integration, each with an icon and description.
Booking Now” and “Browse Facilities.”
& Conditions, Terms of Service), and Contact Info (phone, email, address).
Facilities Page
- The facilities page header displays “Explore Our Facilities” with the
- Filter buttons include All Facilities, Conference Room A, Training Center,
- Service cards display in a grid layout. Each card shows an image, category
description “Browse our comprehensive collection of premium workspaces and specialized facilities.”
Auditorium, Workshop Hall, Cafeteria, Library, and Laboratory A.
badge, title, building location, capacity, amenity tags, price per hour, and two buttons: “View Details” and “Book Now.” The footer displays the same information as the homepage.