Events Management Integration in Mewayz
The Events Management Add-On is a powerful feature designed to help you organize, schedule, and manage events effortlessly within your system.
Introduction
Events Management is a comprehensive software solution designed for organizing and managing events efficiently. This system allows you to create and manage events, handle bookings, track orders, manage customer testimonials, maintain blogs, and configure your event website’s frontend appearance. The software includes a complete dashboard for monitoring event performance, booking management, customer communication through contact forms and newsletters, and FAQ management. It also provides a full frontend website where customers can view events, make bookings, read blogs, and contact your organization.
How to Install the Add-On?
To Set Up the Events Management Add-On, you can follow this link: Setup Add-On.
How to Use the Event Management Add-On?
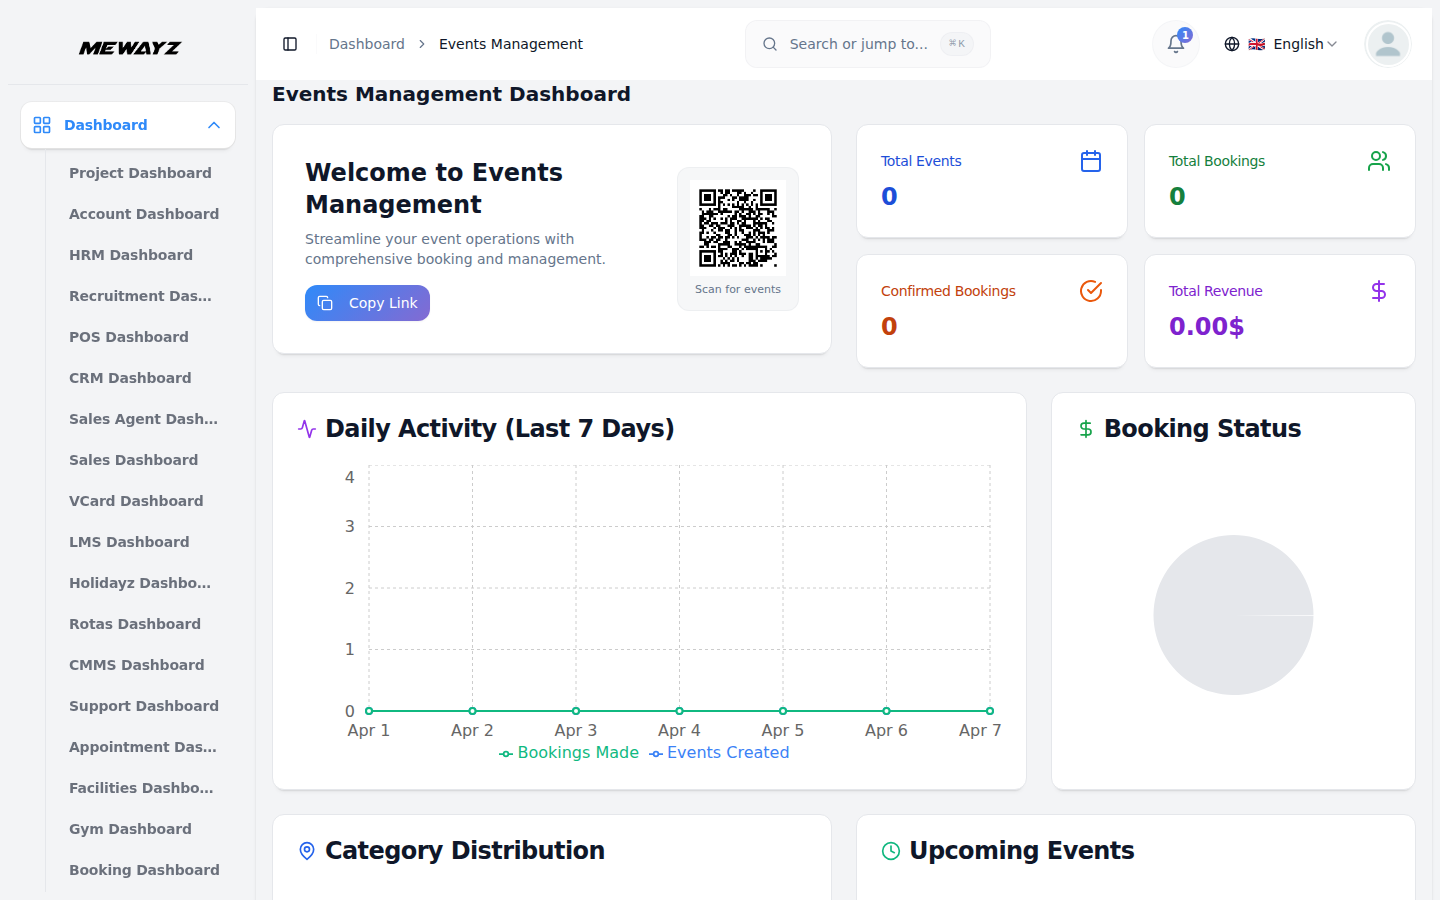
Event Management Dashboard
- The Event Management Dashboard provides a centralized view of your entire event system. From
- The dashboard includes key summary cards showing Total Events, Total Bookings, Confirmed
- Additionally, the Category Distribution section shows how events are spread across different
here, you can easily manage and share your event booking site using a copyable link or QR code, allowing customers to quickly access events and make bookings.
Bookings, and Total Revenue, giving you an instant overview of platform performance. The Daily Activity chart highlights bookings made and events created over the last 7 days, while the Booking Status section helps you track confirmed, pending, and cancelled bookings to analyze conversion trends.
categories, helping you identify popular event types. The Upcoming Events list displays scheduled events with essential details, making it easy to review and manage what’s coming next.
System Setup
Brand Settings
- To configure your brand settings, access the Brand Settings section from the System Setup
- Enter header text that will be displayed prominently on your site, write a footer description
- These brand settings will be automatically applied across your entire frontend website to
menu. Upload your main logo that will appear on your website header, upload a footer logo for the bottom section of your website, and add a favicon that will appear in browser tabs.
that describes your organization, and add footer text for additional information you want to display at the bottom of every page.
maintain consistent branding and professional appearance.
Banner Section
- To set up your website banner, go to the Banner Section in System Setup. In the Banner
- The Frontend Page represents the customer-facing website that connects to all your backend
- In the header section, your logo from Brand Settings is displayed along with a “Find Event”
- Navigation links for Home, Events, Blog, FAQ, and Contact allow visitors to reach different
Section, you can set the Title, Description, Total Events, Booking Text, and Support Text. These fields help highlight your services, display event details, encourage bookings, and provide support information on the homepage.
configurations and displays your events, content, and booking functionality to visitors.
button that directs visitors to the events page.
sections directly. Additional pages include appointment, about, blog, and contact sections.
Feature Section
- The Feature Section lets you configure and display the key features of your event management
- The banner section displays the title, description, total events, booking text, and support
- The feature section shows the title and description from your Feature Section setup, along
website. From System Setup → Feature Section, you can add a title and description, then create multiple feature items In the Value Section, you can configure Ticket Management, Event Discovery, and Social Experience by setting the feature title, icon, and description. Use the Add Feature option to manage multiple features, which will be displayed on the homepage to highlight the main benefits of your platform.
text configured in your backend Banner Section setup. The latest upcoming event poster, name, venue, and category are prominently featured.
with feature icons, titles, and descriptions that highlight your service capabilities.
Event Section
- To set up your website event section, go to the Event Section in System Setup. In this
- The latest events section shows the event title from your Event Section setup, with events
section, you can add the Category Title, Event Title, and Event Description to introduce your events, as well as set the Event Payment Title and Event Payment Description to explain payment options. You can also add the Event Ticket Title and Event Ticket Description to guide customers on ticket usage after booking.
from your Events menu. Each event has a “View Details” button that redirects to the specific event details page for booking.
Blog Section
- To set up your blog section, go to the Blog Section in System Setup. Here you can set the
- The blog section displays the latest blog title from your Blog Section setup, with blog posts
Latest Blog Title, Blog Title, Blog Description, Article Title, and Article Description. These fields help introduce your blog, highlight recent updates, and provide context for individual articles.
from your Blog menu. Each blog has a “Read More” button that redirects to the detailed article page.
Title Section
- Newsletter Section: Add a Newsletter Title, Newsletter Sub Text, and Newsletter Description to
- The newsletter subscription area allows visitors to subscribe, with data saved to your
encourage visitors to subscribe and stay updated.
Subscriber menu.
Contact Section
- To set up your website contact page, go to the Contact Section in System Setup. In this
- In the Business Hours Section, you can add an hours title, set opening and closing hours for
- In the Find Us Section, you can add subway, public transport, and parking facility titles with
- The contact page shows the title and description from your Contact Section setup, along with
- Business hours display the hours title, days, opening and closing hours, holiday status, and
- The message form allows visitors to send messages by filling full name, email address, phone
- The Find Us section displays subway transport details, public transport details, parking
section, you can add a title, description, visit address, call details, support email, and set titles for location, contact, and email along with their icons. These fields organize your contact information and make it easy for customers to reach you.
each day from Monday to Sunday, mark holidays with the on/off switch, and choose an icon for operating hours. This ensures customers know your exact working schedule.
details, choose icons for each, and embed a Google Map iframe. These options help customers easily locate and access your business.
location title, visit address, contact title, call details, email title, support email, and chosen icons.
opening hours icon from your Business Hours Section setup.
number, subject, and message fields. This data appears in your backend Contact menu.
facility details with their respective icons, and a Google Map iframe from your Find Us Section setup.
Custom Pages
- To manage your custom pages, navigate to the Custom Pages section, where you can create and
- Use the Page Footer Display toggle switch to control whether your custom page appears in the
- The system automatically generates a unique Page Slug (URL) for each custom page based on your
- In the Custom Pages list view, you can see all your pages displayed in a table format showing
- Each custom page includes Edit and Delete action options, allowing you to modify content or
configure additional pages for your website. When creating a new page, enter a title that will serve as the page heading, write a description that provides an overview of the page content, and add the main content that will be displayed to visitors.
website footer navigation – when enabled, the page link will be automatically added to your frontend footer menu for easy visitor access.
title, creating SEO-friendly web addresses that visitors can use to access your pages directly.
the Title, automatically generated Page Slug, and Footer Display status. Use the Create button to add new custom pages to expand your website content.
remove pages as needed. Note that default system pages, such as Privacy Policy, About Us, and Terms and Conditions, cannot be deleted to ensure your website maintains essential legal and informational pages.
Footer Section
- To set up your website footer, go to the Footer Section in System Setup. In the Information
- The footer displays your footer logo, description, and text from Brand Settings. Social links
- The flicker stream section shows category posters, useful links include Home, Events, Blog,
Section, you can add your Location, Phone Number, Email, and select icons for each. In the Social Link Section, you can enter multiple Social Media Links and choose icons to display them in your footer.
come from your Footer Section Social Link setup.
FAQ, and Contact Us. Contact information comes from your Footer Section Information setup, including location, phone number, email, and their respective icons.
Testimonial
- The Testimonial Section allows you to manage and display customer feedback on your website.
- You can add multiple testimonials using the Add Testimonial button by entering the Customer
From System Setup → Testimonial, you can set the Testimonial Title and Description that appear on the frontend.
Name, Designation, Profile Image, Rating, and Comment. Saved testimonials are automatically displayed on the website, and you can edit or delete them anytime to keep your testimonials updated.
FAQs
- The FAQs Section allows you to manage frequently asked questions displayed on your website.
- You can add multiple FAQ items by entering a Question and its Answer using the Add FAQ button.
From System Setup → FAQ, you can set the FAQ Title and FAQ Description, along with a Contact Title and Contact Description for users who need additional support.
Once saved, all FAQs are automatically displayed on the website’s FAQ page in an expandable format, helping users quickly find answers to common questions.